5 Easy Dinner Recipes Ready in 30 Minutes or Less
After a long day, the last thing anyone wants to do is spend hours in the kitchen preparing dinner. Whether you’re juggling work, family, or just craving a quick homemade meal, having a collection of fast and delicious recipes is a game-changer. That’s why I’ve put together these five easy dinner ideas that come together in 30 minutes or less—without sacrificing flavor or quality.
From comforting pasta to light and fresh wraps, these recipes are designed to be simple, satisfying, and perfect for busy weeknights. Each dish is packed with bold flavors and requires minimal prep, making them ideal for anyone looking to cook a wholesome meal without the hassle. Let’s dive into these quick and tasty recipes that will make dinnertime a breeze!
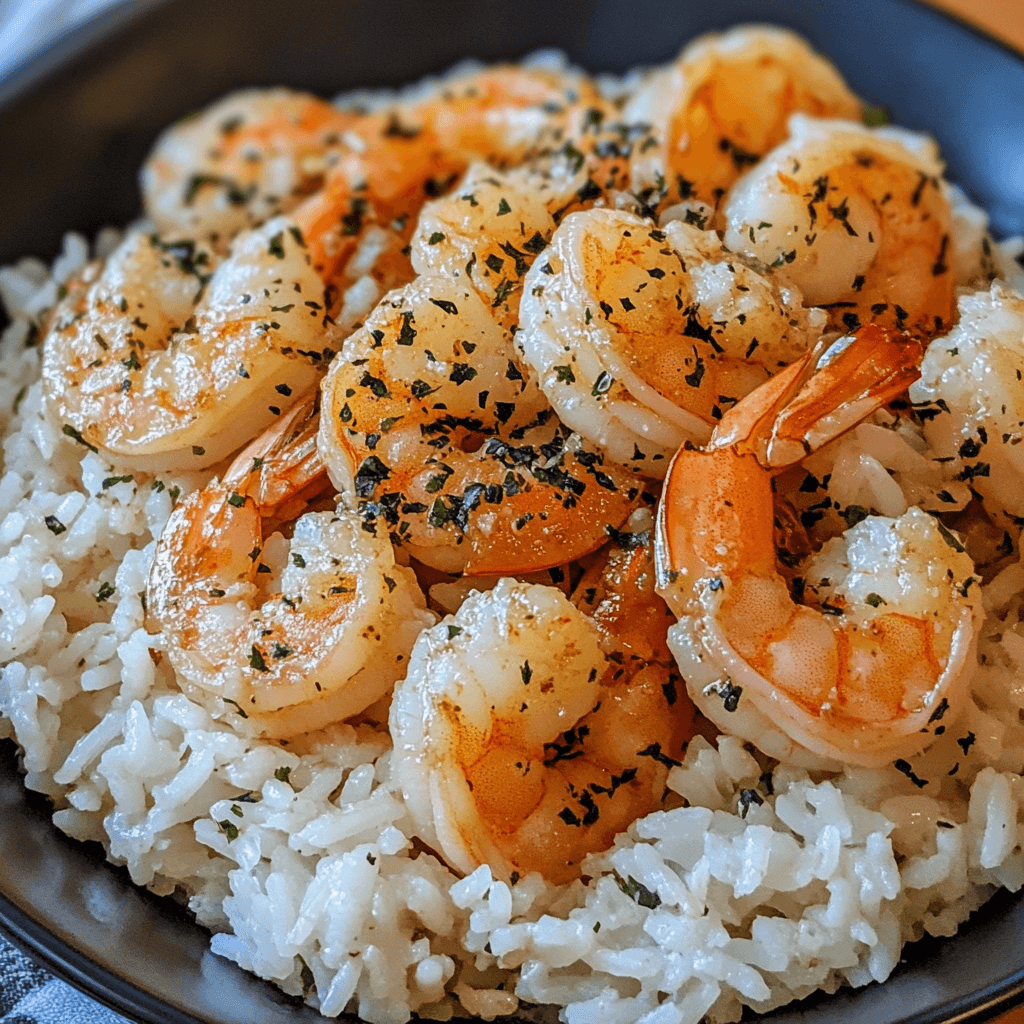
Garlic Butter Shrimp and Rice
A quick and flavorful dish with juicy shrimp tossed in a rich garlic butter sauce, served over fluffy rice. This meal is packed with flavor and comes together in just 20 minutes, making it perfect for busy weeknights.
Ingredients
For the Shrimp:
- 1 lb shrimp, peeled and deveined (fresh or frozen, thawed)
- 2 tbsp butter
- 1 tbsp olive oil
- 4 cloves garlic, minced
- ½ tsp paprika
- ½ tsp salt
- ¼ tsp black pepper
- ¼ tsp red pepper flakes (optional, for heat)
- 1 tbsp lemon juice
- 2 tbsp chopped parsley
For the Rice:
- 1 cup long-grain rice (jasmine or basmati works best)
- 2 cups water or chicken broth
- ½ tsp salt
- 1 tbsp butter
Instructions
Step 1: Cook the Rice
- Rinse the rice under cold water until the water runs clear. This removes excess starch and prevents it from becoming sticky.
- In a saucepan, bring 2 cups of water (or chicken broth) to a boil. Add the rice, salt, and butter.
- Reduce heat to low, cover, and let simmer for 15 minutes.
- Turn off the heat and let it sit for 5 minutes, then fluff with a fork.
Step 2: Prepare the Shrimp
- Heat butter and olive oil in a large skillet over medium heat.
- Add the minced garlic and sauté for about 30 seconds until fragrant.
- Stir in shrimp, paprika, salt, black pepper, and red pepper flakes (if using). Cook for 3-4 minutes, flipping halfway through, until shrimp turn pink and opaque.
- Add lemon juice and chopped parsley. Toss well to coat everything in the flavorful garlic butter sauce.
Step 3: Assemble and Serve
- Spoon the cooked rice onto a plate or serving bowl.
- Top with the buttery shrimp and drizzle any remaining sauce over the rice for extra flavor.
- Garnish with extra parsley or a lemon wedge for a fresh touch.
Tips
- Use fresh or frozen shrimp: If using frozen shrimp, thaw them under cold running water for a few minutes before cooking.
- Don’t overcook the shrimp: They only take a few minutes to cook, and overcooking will make them rubbery.
- Enhance the flavor: Add a dash of Old Bay seasoning or a sprinkle of Parmesan cheese for an extra kick.
- Make it a full meal: Pair this dish with a simple side salad or roasted vegetables for a balanced dinner.
Storage Instructions
- Refrigerate: Store leftovers in an airtight container in the fridge for up to 2 days.
- Reheat: Warm the shrimp in a skillet over low heat with a little extra butter to keep them juicy. Avoid microwaving, as it can overcook the shrimp.
- Freeze: While shrimp is best eaten fresh, you can freeze the garlic butter shrimp (without the rice) for up to 2 months.
Variations
- Spicy Kick: Add a teaspoon of sriracha or cayenne pepper for extra heat.
- Creamy Version: Stir in a splash of heavy cream at the end for a creamy garlic butter sauce.
- Cajun Style: Swap out the paprika for Cajun seasoning to give it a Southern twist.
- Vegetable Boost: Toss in spinach, bell peppers, or mushrooms while cooking the shrimp for a more nutritious dish.
Nutrition Details (Per Serving – Based on 4 Servings)
- Calories: ~320
- Protein: 28g
- Carbohydrates: 40g
- Fats: 10g
- Fiber: 2g
- Sodium: 620mg
FAQ
Can I use brown rice instead of white rice?
Yes! Just note that brown rice takes longer to cook (around 40 minutes), so you may need to prepare it in advance.
What other grains can I use instead of rice?
Quinoa, cauliflower rice, or even couscous would work great as substitutes.
Can I make this dish dairy-free?
Absolutely! Just replace the butter with extra olive oil or a plant-based butter alternative.
What type of shrimp is best for this dish?
Medium to large shrimp work best, but you can use any size. If using smaller shrimp, reduce the cooking time slightly.
This Garlic Butter Shrimp and Rice recipe is simple, quick, and packed with bold flavors. Whether you’re cooking for yourself or serving it as a family meal, this dish is sure to be a hit. Enjoy! 😊
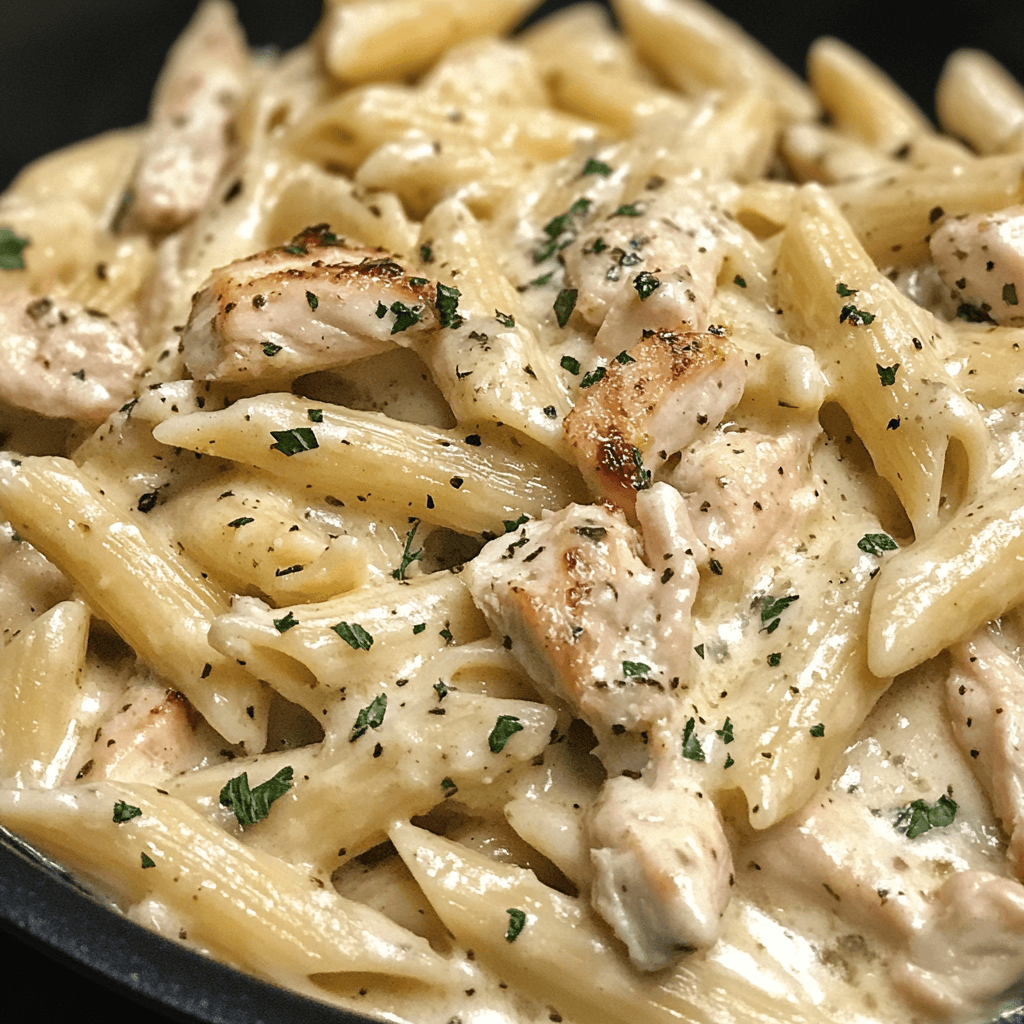
Creamy Chicken Alfredo Pasta
This rich and creamy Chicken Alfredo Pasta is a comforting dish made with tender chicken, fettuccine, and a homemade Alfredo sauce. It’s a restaurant-quality meal that comes together in just 30 minutes, making it perfect for busy weeknights or a special dinner at home.
Ingredients
For the Pasta:
- 8 oz fettuccine pasta
- 1 tsp salt (for boiling water)
- 1 tbsp olive oil (to prevent sticking)
For the Chicken:
- 1 lb boneless, skinless chicken breasts, sliced into thin strips
- 1 tbsp olive oil
- ½ tsp salt
- ¼ tsp black pepper
- ½ tsp garlic powder
- ½ tsp Italian seasoning
For the Alfredo Sauce:
- 2 tbsp butter
- 2 cloves garlic, minced
- 1 cup heavy cream
- ½ cup whole milk
- ½ cup grated Parmesan cheese
- ¼ tsp nutmeg (optional)
- ¼ tsp salt (adjust to taste)
- ¼ tsp black pepper
- ¼ cup chopped parsley (for garnish)
Instructions
Step 1: Cook the Pasta
- Bring a large pot of water to a boil. Add salt and fettuccine.
- Cook according to the package instructions until al dente (about 10-12 minutes).
- Drain the pasta and toss with a little olive oil to prevent sticking. Set aside.
Step 2: Cook the Chicken
- In a bowl, season the chicken with salt, pepper, garlic powder, and Italian seasoning.
- Heat olive oil in a large skillet over medium-high heat.
- Add the chicken and cook for 5-7 minutes, flipping occasionally, until golden brown and cooked through.
- Remove from the skillet and set aside.
Step 3: Make the Alfredo Sauce
- In the same skillet, melt the butter over medium heat. Add the minced garlic and sauté for 30 seconds until fragrant.
- Pour in the heavy cream and whole milk. Stir and bring to a gentle simmer.
- Add the grated Parmesan cheese, nutmeg, salt, and black pepper. Stir continuously until the sauce thickens (about 2-3 minutes).
- If the sauce gets too thick, add a splash of milk or reserved pasta water to loosen it up.
Step 4: Combine Everything
- Add the cooked pasta to the sauce and toss to coat.
- Return the cooked chicken to the skillet and mix everything together.
- Let it simmer for another 2 minutes to allow the flavors to meld.
Step 5: Serve and Garnish
- Divide the pasta into serving bowls.
- Garnish with fresh parsley and extra Parmesan cheese.
- Serve warm and enjoy!
Tips
- Use freshly grated Parmesan cheese – Pre-shredded cheese doesn’t melt as smoothly and can make the sauce grainy.
- Don’t overcook the chicken – Thin slices cook quickly, so keep an eye on them to ensure they stay juicy.
- Adjust the consistency – If the sauce is too thick, add a little more milk or reserved pasta water to thin it out.
- Use different pasta shapes – While fettuccine is classic, penne, linguine, or spaghetti work just as well.
Storage Instructions
- Refrigerate: Store leftovers in an airtight container in the fridge for up to 3 days.
- Reheat: Warm the pasta in a pan over low heat, adding a splash of milk to loosen the sauce. Avoid microwaving, as it can make the sauce separate.
- Freeze: Alfredo sauce doesn’t freeze well due to the dairy content, so it’s best to enjoy this dish fresh.
Variations
- Mushroom Alfredo: Sauté mushrooms with the garlic for a deeper flavor.
- Spicy Alfredo: Add a pinch of red pepper flakes for a little heat.
- Broccoli Alfredo: Steam broccoli and mix it in for a veggie boost.
- Seafood Alfredo: Swap chicken for shrimp or salmon for a delicious seafood version.
Nutrition Details (Per Serving – Based on 4 Servings)
- Calories: ~620
- Protein: 40g
- Carbohydrates: 50g
- Fats: 30g
- Fiber: 3g
- Sodium: 550mg
FAQ
Can I use half-and-half instead of heavy cream?
Yes, but the sauce may be slightly thinner. You can add a little extra Parmesan cheese to thicken it.
What’s the best way to keep Alfredo sauce creamy?
Make sure not to overheat the sauce after adding Parmesan. Gentle heat helps it stay smooth and creamy.
Can I make this dish ahead of time?
You can cook the chicken and pasta in advance, but it’s best to prepare the sauce fresh for the best texture.
What can I serve with Chicken Alfredo?
A side of garlic bread, roasted vegetables, or a simple Caesar salad pairs beautifully with this dish.
This Creamy Chicken Alfredo Pasta is the ultimate comfort food—rich, satisfying, and incredibly easy to make. Whether you’re making it for a cozy dinner at home or impressing guests, this dish is always a crowd-pleaser. Enjoy! 😊
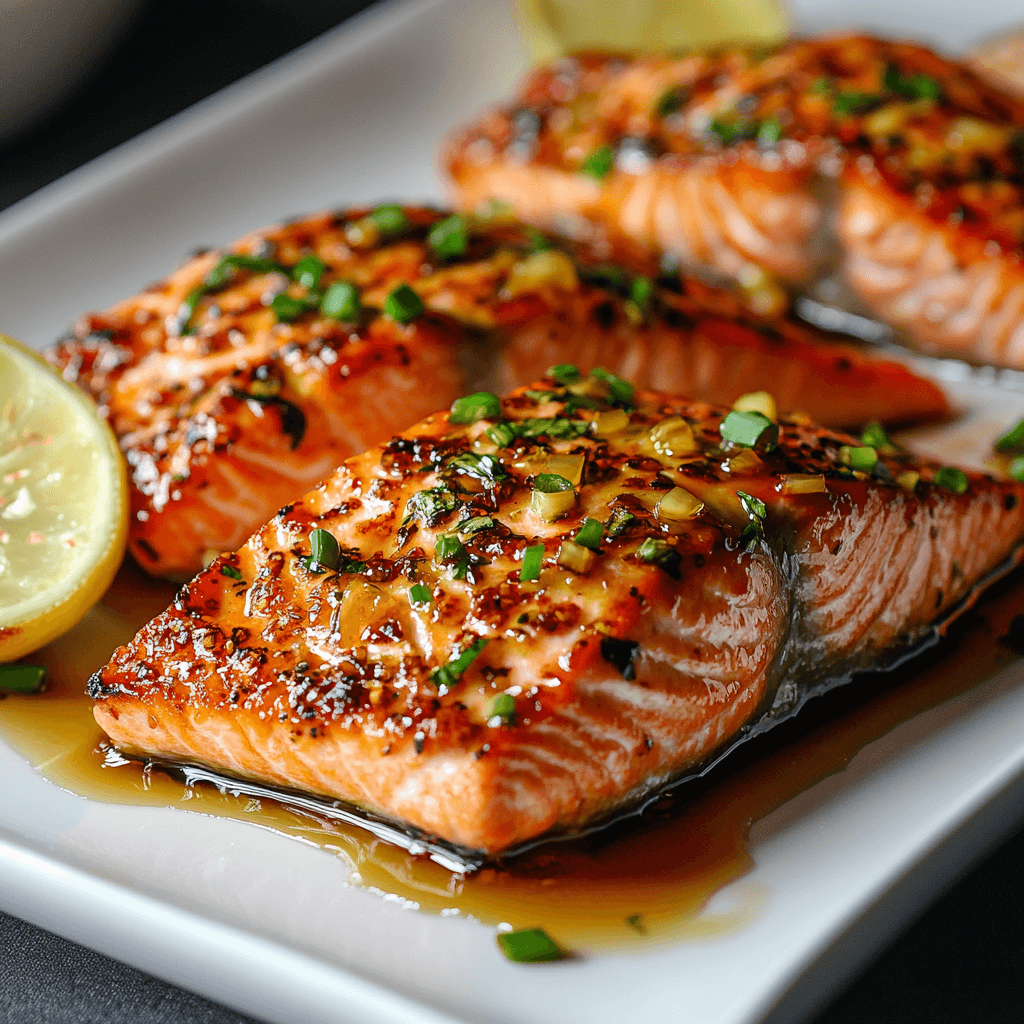
Honey Garlic Salmon
This Honey Garlic Salmon is a quick and delicious dish featuring perfectly seared salmon fillets coated in a rich, sticky, and flavorful honey garlic glaze. With just a handful of ingredients, this dish comes together in under 20 minutes, making it a perfect weeknight meal that feels gourmet without the hassle.
Ingredients
For the Salmon:
- 2 salmon fillets (about 6 oz each)
- 1 tbsp olive oil
- ½ tsp salt
- ¼ tsp black pepper
For the Honey Garlic Glaze:
- 2 tbsp soy sauce (low sodium recommended)
- 2 tbsp honey
- 2 cloves garlic, minced
- 1 tbsp lemon juice
- ½ tsp red pepper flakes (optional, for spice)
- ½ tsp ginger, grated (optional, for extra depth)
- 1 tbsp unsalted butter
For Garnish:
- 1 tbsp chopped green onions
- 1 tsp sesame seeds
- Lemon wedges
Instructions
Step 1: Prepare the Salmon
- Pat the salmon fillets dry with a paper towel. This helps them sear properly.
- Season both sides with salt and black pepper.
Step 2: Sear the Salmon
- Heat olive oil in a large pan over medium-high heat.
- Place the salmon fillets skin-side down (if using skin-on salmon) and cook for 4-5 minutes until the skin is crispy and the salmon is about 70% cooked through.
- Flip the salmon and cook for another 2-3 minutes on the other side until golden brown.
- Remove the salmon from the pan and set aside.
Step 3: Make the Honey Garlic Glaze
- In the same pan, reduce the heat to medium and add the minced garlic. Sauté for 30 seconds until fragrant.
- Add soy sauce, honey, lemon juice, red pepper flakes (if using), and grated ginger. Stir well and let the sauce simmer for 1-2 minutes until slightly thickened.
- Stir in the butter and mix until melted, creating a glossy sauce.
Step 4: Glaze the Salmon & Serve
- Return the salmon to the pan and spoon the sauce over it. Let it cook for another 1-2 minutes to absorb the flavors.
- Remove from heat and garnish with chopped green onions and sesame seeds.
- Serve with lemon wedges for a fresh citrusy finish.
Tips
- Choose fresh salmon: Look for bright, firm salmon with a mild smell. Fresh salmon will give the best flavor and texture.
- Use skin-on salmon for crispy results: The skin helps keep the salmon juicy and flavorful during cooking.
- Don’t overcook the salmon: It should be slightly translucent in the center when removed from the heat. It will continue cooking from residual heat.
- Thicken the glaze if needed: If the sauce is too thin, let it simmer for another minute or add a cornstarch slurry (½ tsp cornstarch mixed with 1 tbsp water).
- Pair it with the right side dishes: Serve over rice, quinoa, or mashed potatoes with steamed vegetables or a fresh salad.
Storage Instructions
- Refrigerate: Store leftover salmon in an airtight container in the fridge for up to 2 days.
- Reheat: Warm gently in a skillet over low heat or microwave in short bursts to avoid drying out.
- Freeze: Honey garlic salmon is best fresh, but you can freeze it for up to 2 months. Reheat slowly to retain moisture.
Variations
- Spicy Honey Garlic Salmon: Add ½ tsp sriracha or chili paste for extra heat.
- Teriyaki Honey Salmon: Add 1 tbsp teriyaki sauce for a deeper umami flavor.
- Baked Version: Bake at 400°F (200°C) for 12-15 minutes and brush with glaze halfway through.
- Air Fryer Honey Garlic Salmon: Cook at 375°F (190°C) for 8-10 minutes and brush with glaze after flipping.
Nutrition Details (Per Serving – Based on 2 Servings)
- Calories: ~380
- Protein: 35g
- Carbohydrates: 18g
- Fats: 18g
- Fiber: 0g
- Sodium: 480mg
FAQ
Can I use frozen salmon?
Yes! Just thaw it overnight in the fridge or use cold running water for a quick thaw. Pat it dry before cooking.
Can I use a different fish?
Absolutely! This glaze works great with cod, halibut, trout, or even chicken.
How do I know when salmon is done?
The salmon should flake easily with a fork and have an internal temperature of 125-130°F (52-55°C) for medium or 145°F (63°C) for well-done.
What should I serve with Honey Garlic Salmon?
Great sides include garlic butter rice, roasted vegetables, steamed asparagus, or a fresh green salad.
This Honey Garlic Salmon is an effortless yet elegant dish that’s packed with sweet, savory, and garlicky goodness. Whether you’re making a quick weeknight meal or a special dinner, this dish is sure to impress. Enjoy! 😊
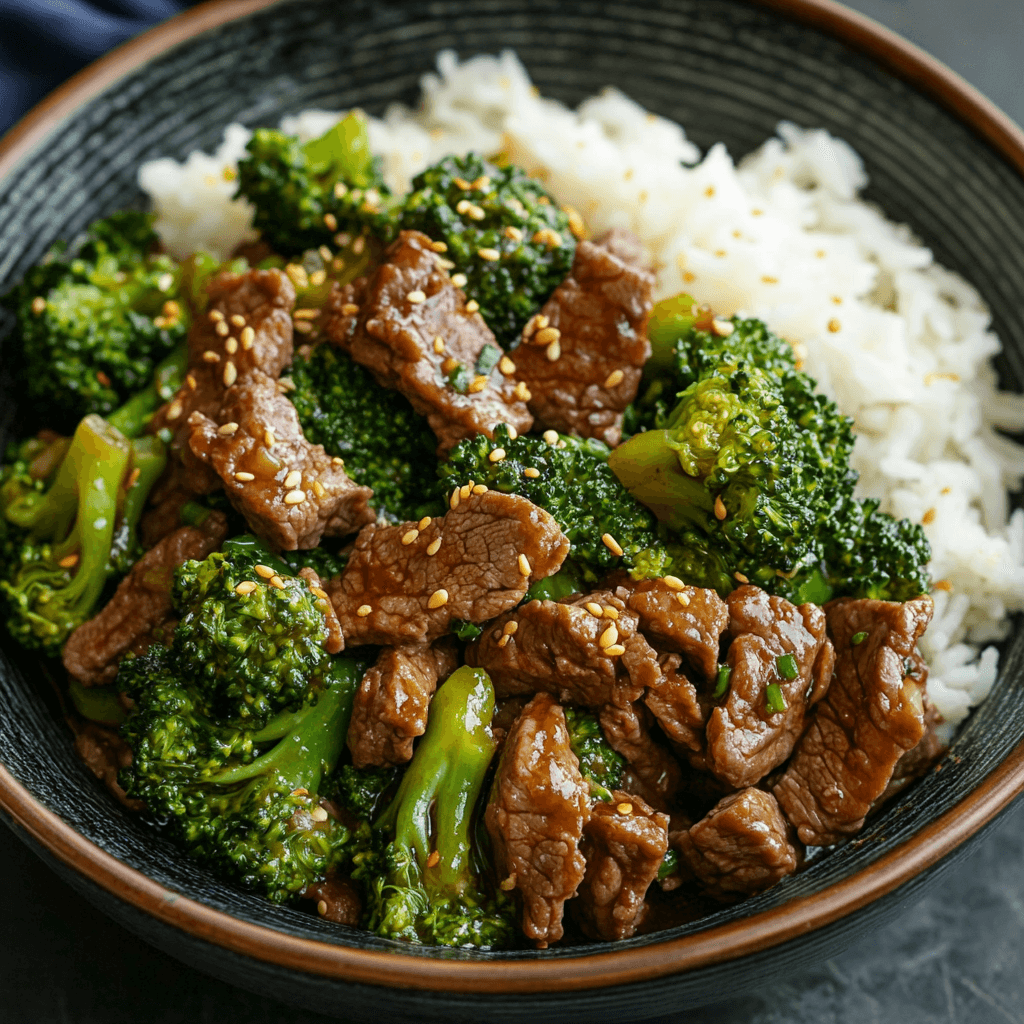
Beef and Broccoli Stir-Fry
This Beef and Broccoli Stir-Fry is a quick and easy dish featuring tender slices of beef, crisp broccoli, and a savory, slightly sweet stir-fry sauce. Ready in under 30 minutes, this dish is perfect for a hassle-free dinner that tastes just like takeout but is healthier and fresher! Serve it over rice or noodles for a complete meal.
Ingredients
For the Beef:
- 1 lb beef sirloin or flank steak, thinly sliced against the grain
- 2 tbsp soy sauce
- 1 tbsp cornstarch
- ½ tsp baking soda (optional, for extra tender beef)
- 1 tbsp sesame oil or vegetable oil
For the Broccoli:
- 2 cups broccoli florets
- 1 tbsp water
For the Stir-Fry Sauce:
- ¼ cup soy sauce (low sodium recommended)
- 2 tbsp oyster sauce
- 1 tbsp honey or brown sugar
- 2 cloves garlic, minced
- ½ tsp grated ginger
- 1 tbsp cornstarch mixed with 2 tbsp water (to thicken)
- ½ tsp red pepper flakes (optional, for heat)
- 1 tsp sesame oil
For Garnish:
- 1 tbsp sesame seeds
- 2 tbsp chopped green onions
Instructions
Step 1: Prepare the Beef
- Thinly slice the beef against the grain (this makes it tender).
- In a bowl, mix the beef with soy sauce, cornstarch, and baking soda (if using). Let it marinate for 10-15 minutes while preparing other ingredients.
Step 2: Blanch the Broccoli
- Heat a large pan or wok over medium heat and add 1 tbsp water.
- Add the broccoli and cover the pan, allowing it to steam for 2 minutes until bright green and slightly tender.
- Remove the broccoli from the pan and set aside.
Step 3: Cook the Beef
- Heat 1 tbsp oil in the same pan over medium-high heat.
- Add the marinated beef in a single layer and sear for 2-3 minutes without stirring.
- Stir and cook for another 2 minutes, then remove from the pan and set aside.
Step 4: Make the Stir-Fry Sauce
- In the same pan, add garlic and ginger and sauté for 30 seconds until fragrant.
- Pour in soy sauce, oyster sauce, honey (or brown sugar), and red pepper flakes (if using). Stir well.
- Add the cornstarch slurry (cornstarch mixed with water) and stir continuously until the sauce thickens, about 1-2 minutes.
- Drizzle in sesame oil for extra flavor.
Step 5: Combine and Serve
- Return the cooked beef and broccoli to the pan, tossing everything to coat in the sauce.
- Let it cook for another 1-2 minutes so the flavors meld together.
- Garnish with sesame seeds and green onions.
- Serve hot over steamed white rice, brown rice, or noodles.
Tips
- Slice beef thinly – Cutting against the grain ensures tender meat.
- Velveting technique: Adding baking soda to the marinade makes the beef extra soft, just like in Chinese restaurants.
- Don’t overcook the broccoli – Keeping it slightly crisp adds texture to the dish.
- Make it gluten-free: Use tamari instead of soy sauce and a gluten-free oyster sauce.
- Use a hot pan: Stir-frying requires high heat to properly sear the beef and develop deep flavors.
Storage Instructions
- Refrigerate: Store leftovers in an airtight container for up to 3 days.
- Reheat: Warm in a pan over low heat or microwave in 30-second intervals, stirring in between.
- Freeze: Freeze the stir-fry (without rice) for up to 2 months. Thaw in the fridge before reheating.
Variations
- Spicy Beef and Broccoli: Add 1 tsp sriracha or chili paste for extra heat.
- Garlic Butter Beef and Broccoli: Stir in 1 tbsp melted butter at the end for a richer taste.
- Cashew Beef and Broccoli: Add ¼ cup toasted cashews for crunch.
- Keto Version: Replace honey with a sugar-free sweetener and serve over cauliflower rice.
Nutrition Details (Per Serving – Based on 4 Servings)
- Calories: ~400
- Protein: 38g
- Carbohydrates: 20g
- Fats: 18g
- Fiber: 3g
- Sodium: 600mg
FAQ
Can I use frozen broccoli?
Yes! Just thaw and pat dry before adding it to the pan. You may need to cook it a little longer.
What’s the best beef for stir-fry?
Sirloin, flank steak, or ribeye are great options. Make sure to slice them thinly against the grain.
Can I make this ahead of time?
Yes! Prep everything in advance and stir-fry just before serving for the freshest taste.
What goes well with Beef and Broccoli Stir-Fry?
This dish pairs well with steamed jasmine rice, fried rice, or lo mein noodles. A simple side of egg rolls or dumplings makes it even better!
This Beef and Broccoli Stir-Fry is a delicious, quick, and satisfying meal that’s better than takeout. With a flavorful sauce, tender beef, and crisp broccoli, it’s a guaranteed family favorite. Enjoy! 😊